How to use the daily time tracker?
Know all about Daily time tracking
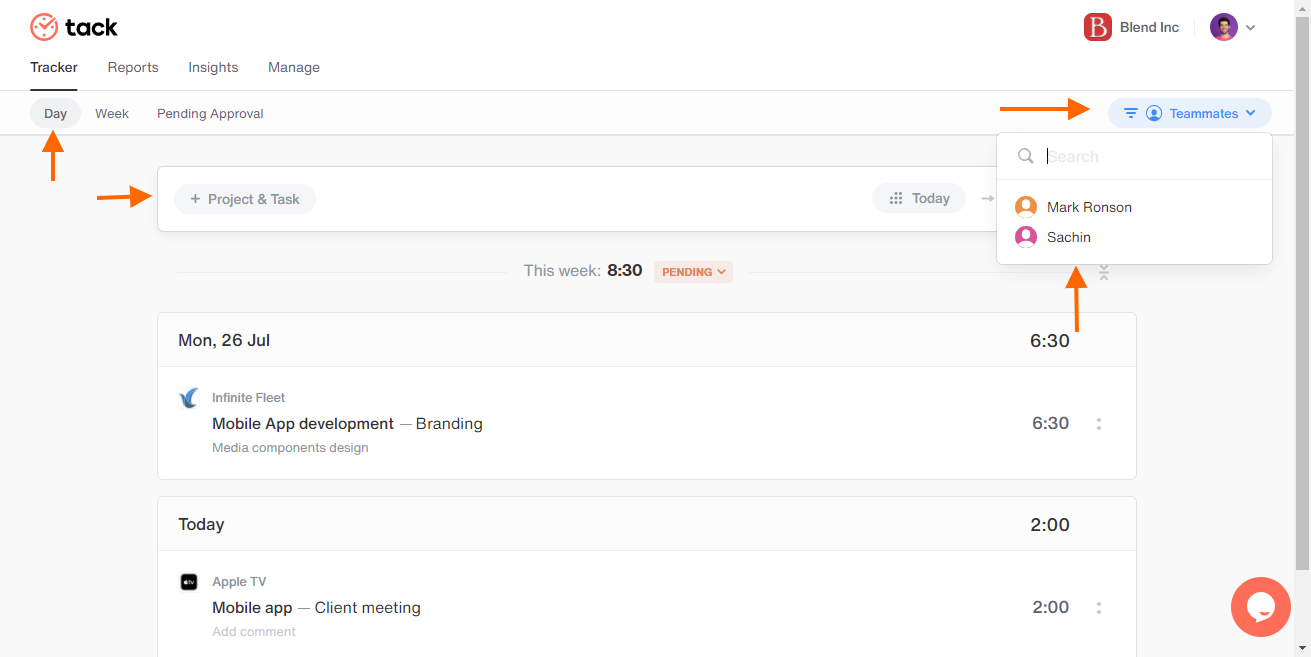
Navigating to Day tracker
Click on the Tracker option followed by the Day option on the next page.
Manual time entry
Choose a project and task through ‘+Project & task’ available on the time tracker bar.
In place of ‘0:00' manually enter the time taken to complete the task for the current day or any previous day. To switch between dates click the ‘Today’ option present on the time tracker bar and choose the date you would like to record your entry from the calendar.
After the above steps are completed hit the ✔️ next to the time entered and the following time entry will be logged in your timesheet.
Feel free to drop any comments on the project and task in the ‘Add comment’ section.
Note 1: The Manual time entry mode is suitable for previously completed tasks and projects.
Note 2: ‘0:00’ indicates hh:mm. For example: In place of 0:00 you enter the number 1, it will be calculated as 1:00 hour. Or in place of 0:00 you enter the number 1:30, it will be calculated as 1 hour and 30 minutes.

Timer mode time entry
- Choose a project and task through ‘+Project & task’ available on the time tracker bar. Click on the play button ▶️ next to 0:00 and the timer will start from 0:00:00 (hh:mm:ss). Once you have completed the task click on the stop button 🟥 and the time entry will be recorded automatically. It will be displayed in the list below.
Note: The timer will record time in 0:00 (hh:mm) and will not include the seconds. The timer is also displayed in place of the tab name in your browser and will work in the background while you complete your tasks.


Edit, Delete or Duplicate time entries
Edit time entry on Day tracker
Identify the time entry you want to change and click on the Project and Task name and a scroll-down menu will appear where you can reselect the desired project or task of a particular client. Edit the comments, by clicking your cursor on the text in the comment section
To edit/change the date click on the ':' icon present next to the particular time entry and click on the change date option. A calendar will appear where you can choose the correct date.
Note: If any time entry has been approved by the Owner or Admin the particular time entry gets locked and cannot be edited.
Deleting or Duplication a particular time entry
Click on the ':' icon present next to the particular time entry and you will find both these options choose according to your requirement.
- Delete - This option will erase the particular time entry from the Day tracker page.
- Duplicate - This option will help duplicate a particular pre-existing time entry on the same page. If you are working on the same project the for coming days you can duplicate a time entry and change the date and hours, this will help save time instead of choosing the project or tasks all over again.
Collapse and Expand timesheet
- Right below the play button ▶️ of the day tracker, click on the Collapse button to collapse the details time entries. Once you have collapsed your time entries the date, project, task, and time are displayed in a tabular column for each week. Click on the Expand button to expand and display all the details of each time entry.
Pending time entry for approval
If any of the week’s time entries displayed on the Day page are pending for approval there is a pending option mentioned next to the dates of each week.
Click on the ‘Pending v’ button in red color, a pop-up window will appear with the details of the projects & tasks worked on the chosen week as well as the total hours,billable and non-billable hours.
Real-time - time tracking using timer mode for recurring projects
- If there is any project that you previously worked on and you need to continue the same project & task on the present day, (Instead of selecting the project and task all over again) hover your mouse cursor on the particular time entry on the Day page and you will get a ▶️ button next to the hours mentioned. Click on the button and a timer will start automatically at the bottom of the screen on the left-hand side.